Bathroom waterproofing during a major renovation
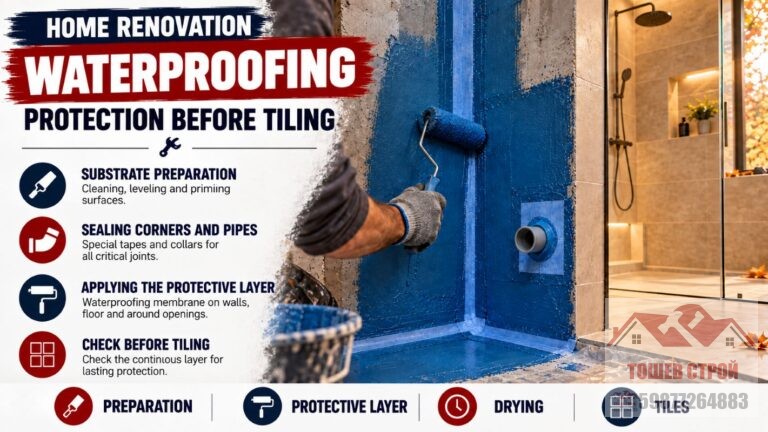
Bathroom waterproofing during an autumn renovation is a stage that should be planned before the delivery and installation of tiles. During this season, renovation work
A winter apartment renovation can be completed successfully when the rooms are enclosed, the heating works reliably, and the schedule allows enough time for materials to dry. Cold weather is not automatically a barrier to indoor construction work. However, it calls for greater attention to temperature, humidity, and ventilation. Consider the condition of the apartment, the type of materials, and whether each stage can be completed in the right order. With good preparation, you can reduce some of the inconvenience and arrange orders and deliveries in advance.
During winter, you can carry out demolition, replace installations, build structures, and complete various finishing works. Conditions inside the apartment matter more than the temperature outside. If the building has no heating, there are leaks, or the rooms are very damp, some tasks may need to wait. Before work begins, arrange an inspection and agree on what the renovation will include.
The start of the renovation is the right time to define the scope, sequence, and organization of the work. If you plan to add electrical outlets, change plumbing, or move sanitary fixtures, make those decisions before closing up the walls and floors. A drawing with measurements and marked installations helps the different tradespeople follow one shared plan. The first stage is covered in the article on planning, demolition, and removal.
An interior renovation usually begins with demolition and preparation, followed by concealed installations, floor screeds, plastering, and structural work. Surface preparation, installation of finishes, and fitting of equipment come next. The exact sequence depends on the condition of the apartment and the planned work. For example, painting should not come before tasks that create dust or could damage the walls. The article on screeds, plastering, and drywall – step 3 covers one of the key stages.
When working with plaster, skim coats, adhesives, screeds, and coatings, follow the application conditions for each specific product. There is no single temperature that applies to every material. Some products require the air and substrate to remain above freezing throughout the drying period, while others have different limits. For example, British Gypsum’s technical guidance specifies conditions for certain gypsum products. Check the packaging and technical data sheet for the chosen mix before use.
Moisture from wet construction processes needs to be removed, but ventilation should not create strong draughts or cause surfaces to cool suddenly. Frequently opening windows wide on a cold day can change conditions in the room. A more controlled approach is advisable, taking the heating and the manufacturer’s instructions into account. Do not point a heater directly at freshly applied material unless this is expressly permitted. Do not block ventilation openings while using products that require specific drying conditions.
A winter schedule should allow time for the required pauses between stages. These are not idle days; they give the materials time to reach the condition needed for the next operation. Drying time depends on the product, layer thickness, substrate, temperature, and humidity. It is not reliable to judge readiness by appearance alone or by applying a fixed timeframe from another project. If a screed, plaster, or skim coat is not ready, covering it too soon can lead to defects and repeated work.
A bathroom can also be renovated in winter if suitable conditions are available for preparation and application. The sequence matters: first resolve issues with the plumbing and substrate, then apply the layers and finishes. Bathroom waterproofing should be selected and installed according to the purpose of the system, the compatibility of its components, and the application instructions. For reference, see the bathroom renovation service and the article on preparing a wet room in autumn.
Before applying finishes, find out why a wall or floor is damp. The cause may be a leak, condensation, residual moisture from construction, or a problem with an exterior wall. Removing only the visible signs will not solve the problem if its source remains. Bathroom waterproofing does not replace repairing a damaged pipe or resolving a structural problem. If the source of the moisture is unclear, arrange an inspection before covering surfaces with tiles, drywall, or paint.
Before placing an order, check not only the quantities but also the transportation and storage requirements. Dry mixes and ready-to-use products must be stored according to the manufacturer’s instructions. Do not leave temperature-sensitive materials in the cold for an extended period if this is prohibited. Delivering materials shortly before they are needed can reduce the risk of improper storage in the apartment. Confirm the sizes and availability of tiles, sanitary fixtures, flooring, and lighting in advance to prevent work from stopping because a component is missing.
Plan the flooring after the substrate has been prepared and confirmed as suitable for the selected finish. Working conditions and timeframes for screeds and adhesives vary by product and system. Explore the services for self-levelling screeds and finishing renovations to see which tasks could be part of the overall project. Bathroom waterproofing should also be coordinated with the selected finish and the next stage of work.
If the apartment remains occupied, separate the work area from the living area as much as the layout allows. Plan for dust protection, safe access to the rooms, and space for personal belongings. Agree in advance when the water or electricity may need to be shut off. A major renovation of the home in autumn can be a good opportunity to prepare a schedule for work that will continue through winter. This helps clarify access, heating, noisy work, and the use of shared areas.
The cold season alone does not determine the final cost or duration of a renovation. These depend on the scope, the condition of the apartment, the selected materials, and any additional work required. Include a reasonable contingency for hidden problems that may be discovered after demolition. Set out the scope, deadlines, payment terms, and process for handling changes in writing. The articles on the construction renovation contract and how the contract works during the renovation provide additional context.
Before each operation, make sure the previous one is complete and that the surface is ready according to the relevant requirements. Look for cracks, crumbling areas, puddles, damage, and unfinished joints around pipes and openings. In a bathroom, inspect the waterproofing before laying the tiles, since the next stages will cover it. For specific systems, follow the manufacturer’s instructions, such as Ceresit’s technical guidance for wet rooms. Set the external link to open in a new window when adding it to the site.
A winter apartment renovation is feasible when the work is planned around the conditions in the home and the properties of the materials. Heating, controlled ventilation, and sufficient time between stages help the work proceed in the right order. Do not start the next operation simply to meet a preset deadline if the substrate or finish is not ready. A major renovation benefits from an overall schedule that connects demolition, installations, wet work, and finishing tasks.
Follow us on Facebook

Bathroom waterproofing during an autumn renovation is a stage that should be planned before the delivery and installation of tiles. During this season, renovation work


Construction renovation with a contract is a service in which the conditions between the client and the contractor are defined in writing before the actual

Finishing works and handover of the property is the final stage of a complete home renovation. The main construction work has already been completed, but

Finishing works and handover of the property is the final stage of a complete home renovation. The main construction work has already been completed, but

Puttying and preparation for painting should be carried out on a sound, dry, and properly prepared surface. Puttying is a key stage before painting because

Puttying and preparation for painting should be carried out on a sound, dry, and properly prepared surface. Puttying is a key stage before painting because

Puttying and preparation for painting should be carried out on a sound, dry, and properly prepared surface. Puttying is a key stage before painting because

Once the planning, demolition, and dismantling work has been completed, the next key stage of the renovation begins. This is when all work related to
With TOSHEV STROY, you infuse your home with the quality and innovation you deserve. Our experienced team offers drywall solutions designed to transform your interior with elegant and functional systems. Whether it’s about installing suspended ceilings, constructing
Suspended ceiling with magnetic track lighting is a modern solution for creating a stylish and functional interior. It is a key design element that shapes the atmosphere, highlights architectural details, and influences the way we perceive a space. That is why more…
We provide professional bathroom renovation solutions where every detail matters. With over 15 years of experience in the field, we use high-quality materials and combine expert craftsmanship. With modern design to transform your bathroom into a cozy, functional.