
Installation of sanitary fixtures and lighting – step 6
- CONSTRUCTION BLOG
- Sockets and switches
Installation of sanitary fixtures and lighting – step 6
Installation of sanitary fixtures and lighting is one of the final stages of a complete home renovation. At this point, the previously installed plumbing and electrical systems are connected to the equipment that will be used every day. The work includes sanitary fixtures, taps, lighting fixtures, sockets and switches. Following the correct sequence reduces the risk of damage to finished flooring, wall coverings and painted surfaces.
The final stage requires precision
Before installation begins, the main construction and finishing works should be completed. Tiles, flooring and painted surfaces should be ready for the installation of the final equipment. Water, drainage and electrical connection points are also checked. This allows any discrepancies to be identified before sanitary fixtures, furniture and lighting fixtures are permanently installed.
Installation of sanitary equipment
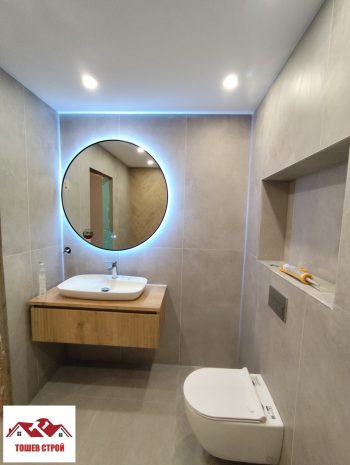
Once the bathroom is finished, the visible sanitary elements can be installed. Depending on the project, these may include a toilet, washbasin, taps, shower system and other specified components. With some systems, sanitary fixtures are installed after the wall finishes have been fully completed. Each product should be installed according to the technical instructions provided by its manufacturer.
- installation and secure fixing of sanitary fixtures;
- connection to the previously installed water supply and drainage outlets;
- installation and connection of taps, traps and other accessories.
Checking the water connections
After connection, the system should be tested under normal operating conditions. Particular attention is paid to connections around taps, traps and sanitary fixtures. The aim is to identify any potential leaks before the room is put into regular use. The proper drainage of water into the waste system should also be checked.
Protecting finished surfaces
Installation on finished tiles and flooring requires careful work. Drilling and fixing methods should be suitable for the specific substrate and the fasteners being used. The location of concealed pipes and cables must also be considered. This reduces the risk of damaging installations that have already been completed behind walls or beneath finished surfaces.
Installation of lighting fixtures
Once the main electrical installation work has been completed, the specified lighting fixtures can be fitted. This includes ceiling and wall lighting, as well as other components included in the project. The selected products must be suitable for their intended installation location. Particular care is required in bathrooms and other areas where electrical equipment may be exposed to moisture.
- installation of the specified lighting fixtures;
- connection to the prepared electrical points;
- operational testing after installation has been completed.
Magnetic track lighting for ceilings
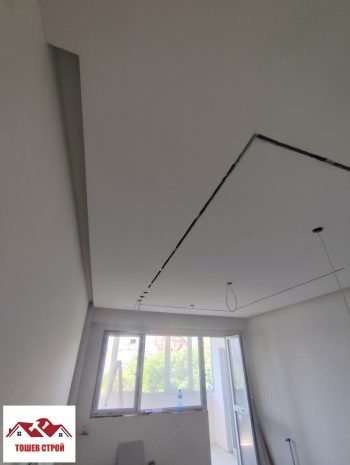
Magnetic track lighting uses a track onto which compatible lighting modules are installed. The system allows the lighting to be arranged according to the purpose and layout of the room. With recessed solutions, the position of the tracks is planned during the construction of the ceiling. This is particularly important with plasterboard, as the profiles must be integrated before final filling and painting.
Depending on the selected system, the following can be used:
- linear lighting modules for even light distribution;
- directional spotlights for accent or functional lighting;
- pendant lighting fixtures when supported by the specific track system.
Installation and configuration of the system
Once the ceiling has been completed, the specified lighting modules are installed. Magnetic mounting allows their position along the track to be adjusted within the capabilities of the particular system. This provides greater flexibility when arranging general and accent lighting. Power supplies, drivers, tracks and lighting modules must be technically compatible and installed according to the manufacturer’s instructions.
When planning magnetic track lighting, the following should be considered:
- the type of track – recessed, surface-mounted or suspended;
- the layout and required length of individual track sections;
- compatibility between tracks, power supplies, drivers and lighting modules;
- access to components that may require future maintenance.
Sockets and switches
At this stage, the visible components of the electrical installation are usually completed as well. Switches, sockets and their corresponding decorative frames are installed. Their positions have already been determined during the installation of the electrical system. Before final commissioning, the fixing and correct operation of the installed components are checked. Electrical installation work should be carried out by qualified professionals.
Electricity in rooms with water
Bathrooms require particular attention because water and electrical equipment are present in the same space. The position and specifications of electrical components must comply with the applicable requirements for the relevant zone. Not every lighting fixture, socket or electrical appliance is suitable for every location in a bathroom. For this reason, the specific solution should be determined during the design of the electrical installation.
Coordination between plumbing and electrical installations
Modern sanitary equipment sometimes requires both water and electrical connections. Such solutions can be planned during the installation of concealed services. When the necessary connection points are provided in advance, finished walls do not need to be opened later. This is particularly important for equipment that requires a power supply or includes additional electronic functions.
Advance planning matters
The final installation reveals how accurately the previous stages have been completed. An incorrectly positioned water outlet, socket or cable can make installing the selected equipment difficult. Therefore, the dimensions and technical requirements of sanitary fixtures and lighting should be known in advance. This allows concealed installations to be coordinated with the actual components before the walls are finished.
Final checks after installation
Once the work has been completed, all newly installed components should be checked. For sanitary equipment, connections, drainage, stability and normal operation are inspected. For electrical components, the operation of lighting, switches and sockets is checked. These inspections should be completed before the relevant installation work is finally accepted as finished.
- checking water connections for leaks;
- checking drainage and the operation of sanitary fixtures;
- functional testing of the installed electrical equipment.
Correcting identified issues
If a problem is identified during inspection, it should be corrected before the room is put into regular use. This may involve a poorly sealed water connection, an incorrectly secured component or an electrical fault. Prompt correction helps prevent the need to dismantle equipment after the renovation is complete and allows each system to be checked separately.
The final details before use
After the technical checks, the sanitary fixtures, lighting and surrounding finished surfaces are inspected. Installation debris and temporary protective materials are removed. All specified components are checked to ensure they have been installed and are operating correctly. Only then can the rooms be prepared for furnishing and normal use.
Installation of sanitary fixtures and lighting as a final stage
The installation of sanitary fixtures and lighting connects the previously completed systems with the home’s final equipment. At this stage, the accuracy of the plumbing and electrical work becomes visible and can be tested in practice. Good coordination between different specialists is particularly important when water, electricity, finished surfaces and different types of equipment come together within the same room.
When the renovation is actually complete
Completing the construction work means more than having clean walls and finished floors. All installations and final components must operate as intended. Once the sanitary fixtures, lighting, sockets and switches have been checked, the final cleaning and organisation can be completed. In this way, step six brings the main renovation works to their practical conclusion.
If you need sanitary fixture installation in your bathroom and lighting modules, as well as any other construction and renovation services, contact us.
Follow us on FB
PARTHNERS
FOLLOW US:

Winter apartment renovation
A winter apartment renovation can be completed successfully when the rooms are enclosed, the heating works reliably, and the schedule allows enough time for materials

Bathroom waterproofing during a major renovation
Bathroom waterproofing during an autumn renovation is a stage that should be planned before the delivery and installation of tiles. During this season, renovation work

Construction renovation with a contract – part 2
Construction renovation with a contract is a service in which the conditions between the client and the contractor are defined in writing before the actual

Construction renovation contract – Part 1
Finishing works and handover of the property is the final stage of a complete home renovation. The main construction work has already been completed, but

Finishing works and handover of property – step 7
Finishing works and handover of the property is the final stage of a complete home renovation. The main construction work has already been completed, but

Installation of sanitary fixtures and lighting – step 6
Puttying and preparation for painting should be carried out on a sound, dry, and properly prepared surface. Puttying is a key stage before painting because

Flooring- doors and painting step 5 home renovation
Puttying and preparation for painting should be carried out on a sound, dry, and properly prepared surface. Puttying is a key stage before painting because

Puttying and preparation for painting step 4 home renovation
Puttying and preparation for painting should be carried out on a sound, dry, and properly prepared surface. Puttying is a key stage before painting because

Screeds and plaster – drywall – step 3
Once the planning, demolition, and dismantling work has been completed, the next key stage of the renovation begins. This is when all work related to

Home renovation – Step 2
Once the planning, demolition, and dismantling work has been completed, the next key stage of the renovation begins. This is when all work related to
RELATED SERVICES WITH PUBLICATION
DRYWALL
With TOSHEV STROY, you infuse your home with the quality and innovation you deserve. Our experienced team offers drywall solutions designed to transform your interior with elegant and functional systems. Whether it’s about installing suspended ceilings, constructing
ceiling with magnetic lighting
Suspended ceiling with magnetic track lighting is a modern solution for creating a stylish and functional interior. It is a key design element that shapes the atmosphere, highlights architectural details, and influences the way we perceive a space. That is why more…
Bathroom renovation
We provide professional bathroom renovation solutions where every detail matters. With over 15 years of experience in the field, we use high-quality materials and combine expert craftsmanship. With modern design to transform your bathroom into a cozy, functional.